© Rachel Ricks 2008-2009

Saturday, January 31, 2009

12 Weeks To Better Photos...Week 7

This week was focused on taking photos outdoors. Taking pictures outdoors is my favorite. I'm in love with natural light photography. When we're outdoors we will almost always have an abundance of light.
Focus on the intensity and direction of the light. Often times we'll find ourselves in situations with far too much light, which can be difficult to shoot because if it's an extremely sunny day, the light will generally be very harsh, causing areas that are much too bright and shadows that are much too dark.
Pay attention to the direction of the sun. Try to arrange your subject so that the lighting comes from a side angle rather than directly in front of or behind the subject. You don't want to blind your subjects, not to mention make them squint, by having them face the sun. You also don't want to point your camera so that the sun is directly in your lens as this creates difficult exposures as well as lens flares (though flare can certainly be used effectively in specific situations.) If you do find yourself in a situation where you have backlighting (where the light source is behind your subject) you have two options that we've already explored through our challenges in previous weeks: expose correctly for your subject and have the background overexposed, or use fill flash to expose your subject while the camera exposes your background.

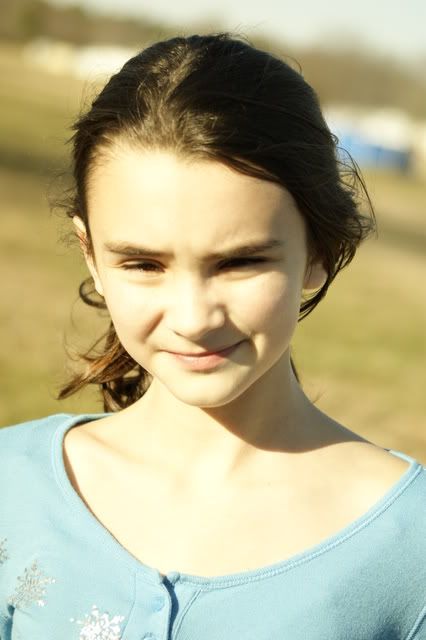
In this picture the sun is too harsh and causes really dark shadows and the skin and white shirt are too bright.
Photobucket

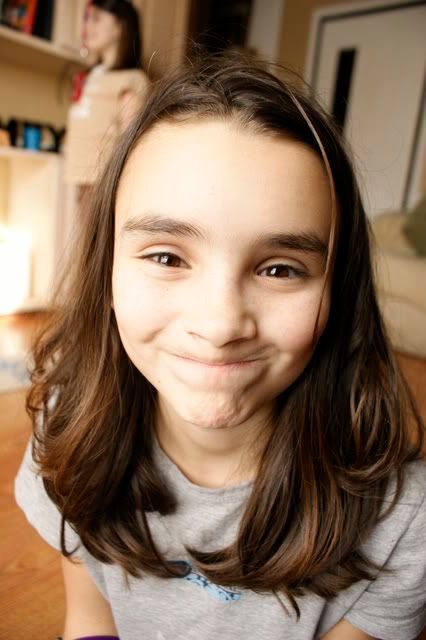
In this photo she is squinting and there dark shadows.
Photobucket

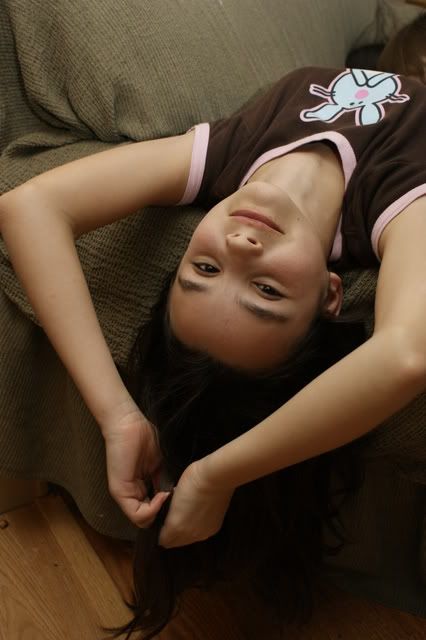
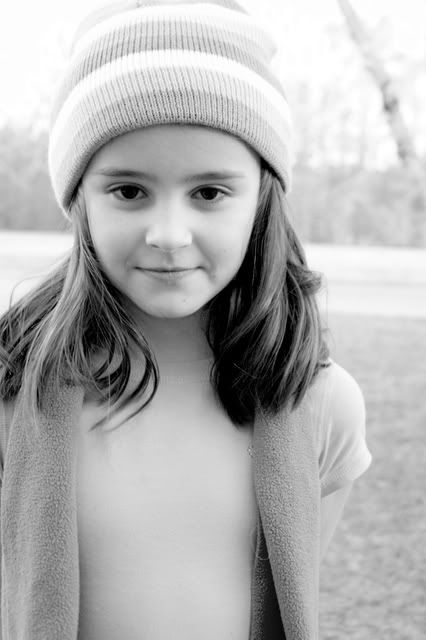
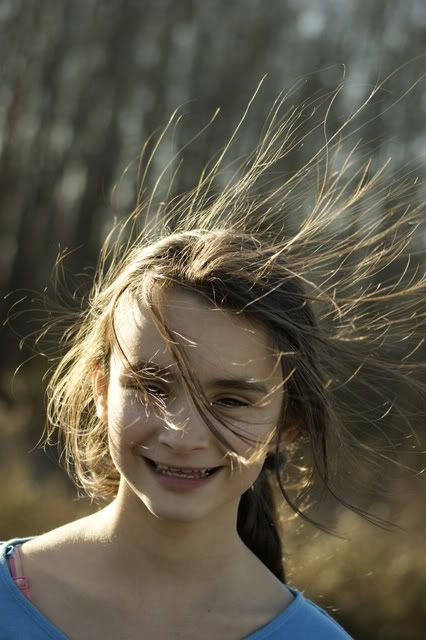
With this one the sun really highlights the hair so you can really see how much it really sticks up. If I had taken the time, I could have used fill flash and her face would be better exposed but I didn't think of it at the time...still learning and trying to remember to put to use all the info from the course. That's why I practice. :)
Photobucket

For these we simply moved into the shade. (These are SOOC and I'd love some CC on what you think would make these even better. All taken using a 75-300mm lens. Thanks!)
Photobucket
ss: 160, f/4.5, ISO: 400

Photobucket
ss: 160, f/4.5, ISO: 400

Photobucket
SS: 125, f/4.5, ISO: 200

This week's challenge was using macro outdoors.
Macrophotography, according to the online Oxford American Dictionary, is defined as photography that produces photographs of small items larger than life size. Since some of themost wonderful things to shoot outdoors are very small (such as flowers, insects, and water droplets) it's very helpful to use the macro mode on your camera or a lens with a macro option.
Usually indicated by a flower icon on the dial of your camera, selecting the macro mode indicates to your camera that you want to get a close-up. However, here's the catch: while the macro mode works effectively on point & shoot cameras, on SLR & dSLR cameras the same setting merely sets the stage for using a lens with a macro. Basically, the main job of macro mode on your point & shoot camera is to effectively reduce the minimum focal distance -- the distance between the camera and the subject. What this means is that when you are using macro mode you should be able to hold your camera closer to your subject than when you're not using the mode. Macro mode on an SLR camera without a macro lens will still provide you with a pleasing, shallow depth of field, but using it does not have the same effect that using a macro lens would give you in order to highlight your small treasure.

The challenge...
1. With your point & shoot camera -- We want to see the difference between macro mode & another mode, so simply take a picture of an object after selecting macro mode on your camera. Move as close to the object as your camera will allow. Then take the picture again in a different mode.
2. With your SLR/ dSLR camera -- If you have a lens with macro, use it! (Use a tripod for more control and ease of use.) Unfortunately, if you don't have a lens with macro, the macro mode setting will just give you a shallow depth of field for your photos. You can still take a photo using this mode, but it's not the same as having a lens with a macro. To compensate, you could try "imitating" a macro shot by taking a photo and then cropping it very closely in a photo editing program.

When I first bought a macro lens I quickly became addicted!
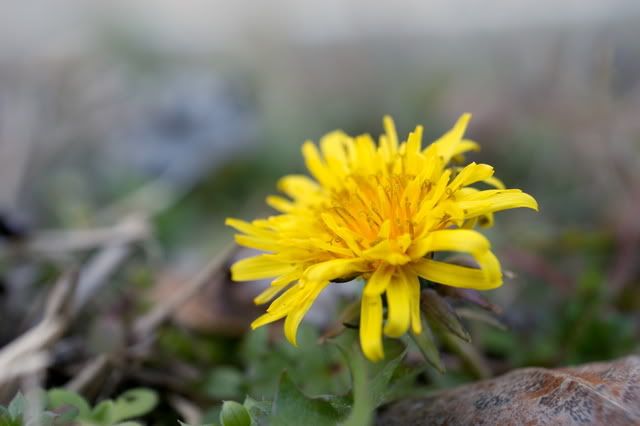
Being the middle of winter I had to hunt for something better than dead leaves and grass to photograph outside in my yard. I finally found one single yellow dandelion on the edge of my driveway. It's a good thing macro photography can make just about anything look cool.
Photobucket
Photobucket

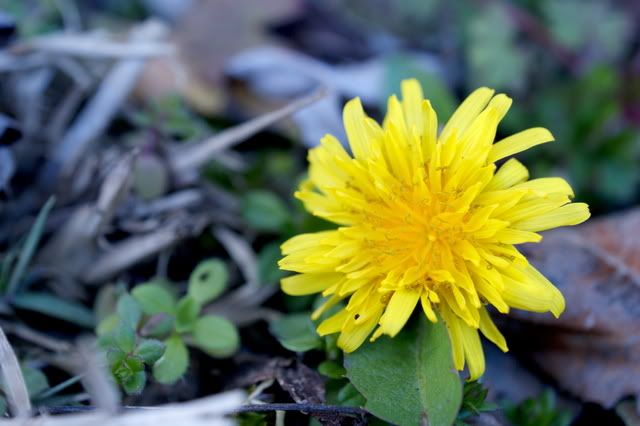
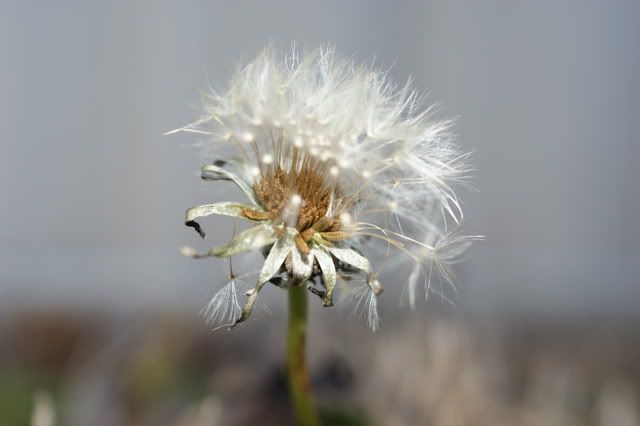
A few steps away I found this little guy. I do love dandelion puffs.
Photobucket

To view more of my macro photos click here.

The info I shared was found in the 2 Peas photography course. Click here to read more.

Sunday, January 25, 2009

12 Weeks To Better Photos...Week 6

Making the Most of Natural Light
1. Find it
To make the most of natural light, it's very important to be aware of where the natural light is in your home as well as when it's available.

2. Indirect light vs. Direct light
Perhaps the BEST aspect of natural light indoors occurs when the sun isn't shining directly in the windows, but is instead providing indirect natural light. Indirect natural light provides you with a well-lit area that doesn't have the strong shadows, or contrast, of direct light. (You can use lightweight or sheer curtains or blinds to help filter direct light to achieve the same effect.)

3. Use Natural Light Sources to your Advantage
Windows and doors (storm doors or French doors, for instance) are great sources of natural light. Your position and the placement of your subjects in relation to the natural light source makes a big difference as well.

If the subject is facing the window or door while the photographer is with his/her back to the window you will create catchlights in the subject's eyes.
Catchlights are highlights in the eyes of a subject, and in this case the catchlights will look like the light source (window or door) because that is what the eyes are reflecting.

The challenge: take advantage of your windows this week!
You can use any type of camera this week, but please try to take
these photos without a flash.
Choose one or all of the following options for taking your photos:
1. Position your subject in direct light and then reposition your subject in
indirect, or filtered, light.
2. Capture catchlights - have your subject face the window while you're sitting or standing with your back to the window.
3. Position your subject so that he/she/it is parallel to the window, while you are perpendicular to the window.
4. For those with SLRs or digiSLRs: If you can adjust the exposure meter on your camera, try metering on the background light vs. metering on your subject and
setting the exposure for your subject. Also note that you could use a wall in the room or the floor to set your exposure meter.

I didn't get a chance to take as many photos as I wanted this week. Here's a few with pretty good catchlights. My daughter was facing our window in the late afternoon. As you can see, she wasn't really in the mood to help me out and be my practice subject. :) But you get the idea, right?

Photobucket

Photobucket

Photobucket

To learn more about taking photos indoors and taking advantage of natural light click here and scroll down to lesson 6.

Sunday, January 18, 2009

12 Weeks To Better Photos...Week 5

Composition

Composition was probably the first thing I tried to improve on with my photography. In my opinion, composition is the fun part. Climbing ladders, balancing on the arm of a couch, and laying on the ground are just some of the crazy things I've been known to do to get a better composition. Yep, fun stuff!

This week in the lesson from 2 Peas they shared 6 different rules for better composition, but just like the pirate code, they are more of a guidline, but they are good guidlines to follow.

1. Keep it simple - eliminate distractions...watch the background/foreground for distractions, you don't want a branch growing out of the side of someone's head.
You can remove distracting elements from your photos by physically moving them out of the scene, repositioning your subjects in a better location, taking a few steps forward for a close-up shot, or decreasing your depth of field.


2. Apply the rule of thirds - Mentally divide your scene into 3rds as you're looking through your viewfinder or at the LCD screen. To follow the rule you'll want to compose your photo so that your subject(s) or action is located at one of the intersecting points rather than in the middle, or dead center, of the image.


3. Keep an eye on the horizon...the rule of thirds applys to photographing the horizon as well.
Place the horizon about 2/3 of the way up on the photo to keep the focus on what is below it
(such as land or water) OR position the horizon about 1/3 of the way up on the photo if you want the focus to be on what is above it (the sky.)


4. Frame your subject...
Use elements in the foreground of your photo to frame the center of interest. Architectural elements (such as arches or fences) as well as those found in nature work well for this.


5. Fill the frame...
Allow your subject to dominate the photo (fill the frame) to give it more prominence. Keep in mind that cropping your photos in an editing program is a simple fix. It's also important to distinguish that empty space in a photo is not necessarily considered wasted space when used effectively.


6. Try a new perspective...or different point of veiw.
Make sure to examine your subject from different angles - a new view can change the perspective of the whole photo.

The challenge: play around, try them all, or combine different rules together!

Here are a few from this weekend.

I liked this perspective because it portrays a comfy feeling. This would have a totally different feel if I had taken the photo standing infront of them with them looking at the camera straight on.
Photobucket

In this one I kept it simple and filled the frame.
Photobucket

My daughter created a frame around her face with her arms and I thought this was a fun point of veiw.
Photobucket

Monday, January 12, 2009

Texture

This is the first time I've tried adding texture to my photos. I thought these Rock Band pictures would be fun to play around with.

These are SOOC...
Photobucket

Photobucket

And here's the edits...
Photobucket

Photobucket

Photobucket

I really like that with the texture layer added you can't see my kitchen trash can. :) I think the last one is my fav of these.
It was fun playing around with textures. I don't know why it took me so long to try it out. Thanks for the push peas!

Sunday, January 11, 2009

Coming Out of the Dark...

I've been playing with my external flash and I'm telling you I'm falling in love with my old enemy. I really like bouncing the flash by pointing the light up or other directions, bouncing the light off of the walls or ceiling. It gives an excellent amount of light without causing an ugly flashy feeling snapshot. No harsh shadows and too white faces or dark and grainy photos for me anymore! I've come out of the dark, lol.
Here's a comparison. Both are SOOC. The only difference is I used my external flash, bouncing it off of the ceiling.

Photobucket

Photobucket

It is important to remember to set your CWB with the flash on or the colors can go wonky.
So if you have been squeamish about using your external flash, I challenge you to try it.

Saturday, January 10, 2009

Week 4: Flash

Flash. I've always hated using flash. It made everyone's faces too white and created really harsh shadows. Learning aperture, shutter speed, and ISO helped get a better photo but in low light situations using the flash is the best option. There are two main types of flash - internal and external. Internal being the one on your camera. External is a flash that can be removed from your camera.

Indoors is where we are most often stuck with bad lighting conditions and we are forced to use flash. Here are some tips from the Two Peas lesson info on how to get better photos indoors while using on camera flash.
Consider distance -
move your subjects as far away from walls as possible
keep your subjects 5-6 feet in front of you
your subject usually needs to be no further than about 10 feet
Consider glare -
pay attention to the surfaces infront of you...glass, shiny, or mirrored surfaces will reflect
for eyeglasses, have the person tilt them down slightly


Flash can also help with photos outdoors.
Even when you're outdoors you can run into situations where your subject's eyes are completely shadowed because the light source is too high or your subject is slightly in the shade while the rest of the scene is well-lit. This is where your flash will come in handy.


So here's the challenge this week:
What can you do to eliminate shadows in outdoor photos?

You can use almost any shooting mode (such as AV or portrait) to accomplish parts 1 & 2, as long as the mode allows you to turn on your flash.
1. Use fill flash to "pop" colors on a gray day.
This one should work well with winter! Take a photo of your subject outdoors without the flash. Then manually turn on the flash for your camera so that it fires when you're taking a photo. (It helps to have a colorful subject or setting for this part of the challenge.)
2. Use fill flash to eliminate dark shadows on the face on a bright day.
Take a picture of a human subject outdoors in the sunshine without the flash. Then manually turn on your flash. (Your camera is going to think you're crazy since it knows that it already has enough light on a sunny day, so double check to make sure that your flash is going off before taking the second photo of your subject.)
3. Use fill flash to combat backlighting on a shadowed subject.
This challenge works best if your subject is in a shadow, or not as brightly lit as the background and surroundings. You will get the best results if you do this option in manual mode. The best thing to do is to manually turn on your flash on the camera, then meter on the brightest area of the photo you wish to take. Set your exposure meter for the bright area. Then recompose to focus on your subject and press the shutter. Ideally, your flash will fire, giving light to your subject while the camera takes care of the background. Your camera will expose the brighter area of the photo correctly and your flash will fire enough to expose your shadowed subject correctly. Now turn off your flash and take the photo again without the fill flash.

This is an example of using flash on a cloudy day. On the left with no flash. On the right with flash.
PhotobucketPhotobucket
I'm still learning about using flash and how flash can be my friend. I just recently purchased an external flash and I'm so excited to learn to use it, especially for indoors! I've been playing around with it today and was so happy with the results. Practice, practice, practice.

Most of the info I shared in this post was from the Two Peas course 12 Weeks to Better Photos.

Happy shooting!

Friday, January 9, 2009

Feeling Neglected...

Thought this was great for the word neglected in the photo scavenger hunt.

Photobucket
"Puh-sleeze, I play 'a Wii!"
And mean old mom said, "No."

Thursday, January 8, 2009

Guess What I Have...

The sweetest husband in the world AND my very first DSLR camera!
I am SO excited and SO happy with the photos I am getting and I haven't even learned all the bells and whistles. It is amazing to see the difference in a SOOC (straight off of camera) shot on my DSLR and my old bridge camera. I'm in love! So now I get to learn lenses and off camera flash. I can't wait!
Here's what my new baby looks like...
Photobucket
Photobucket

Here are a few shots I was able to get today. Still trying to learn what settings work best with this one and how to get a good focus where I want it using an actual lens, so these aren't perfect, but I wanted to share anyway. :)
Photobucket

Photobucket

and one converted to b&w...
Photobucket
I should have used flash to give her catchlights and that would have been perfect for week 4 of the 2peas 12 weeks to better photos assignment (which I am doing this week.)

Thanks for letting me share!

Any tips, suggestions, and constructive criticism appreciated!!

Wednesday, January 7, 2009

Lovely Lashes

I used a macro lens to get this shot.
Photobucket
Sleeping babies are the sweetest!

Tuesday, January 6, 2009

Ready, Set, here {Wii} Go!

Here's my first posted picture for 2009.
This year I am participating in a few challenges on 2 Peas in a Bucket. You can find the lists of the challenges in the sidebar to the left. Feel free to play along. I'd love to see your take on these themes. This is for the weekly challenge 1/5 - Ready, Set, Go!
Photobucket
Me on the Wii! My goal is to excercise each morning using the Wii Fit. Here's to a thinner mii!

What Do I Do With My Photos~Scrapbook, Of Course! My first love is scrapbooking. Take a peek...

Scrappy Side

A Little About Me & Photography

I have always enjoyed photography. As a young girl I remember driving my parents crazy always using the camera and begging them to pay extra for one hour processing. Thank goodness for digital. I love the instant gratification being able to see the photo instantly on the back of the camera. One day I made a cute little tutu and had my daughter model it for pictures. They were some of the best I had ever taken. As I looked over those photos I thought, "I want to learn more." Since then I have taken courses and joined photography groups for knowledge and support as I learn more about photography. Thank you to all of my friends and family who have patiently allowed me to practice on them. Thanks to my sister, Amy, who joins me in this learning journey. A big thank you to my sweet husband who supports and encourages me in all I do. There is so much satisfaction when I capture that perfect shot. I want to capture the everyday moments in a beautiful and creative way. I want to document the ordinary. Like the saying goes..."Enjoy the little things in life...for one day you'll look back and realize they were the big things." I hope to record the little things with my photography. Little moments captured forever. It's like time in a bottle.

My Copyright Notice

Please be aware I have worked very hard to create everything displayed on this site. Please do not use, copy, or print these photos without permission. Copyright © 2008, 2009 Rachel Ricks. Thanks!

Just Curious...